|
Jig TyingTie Your Own Customised
|
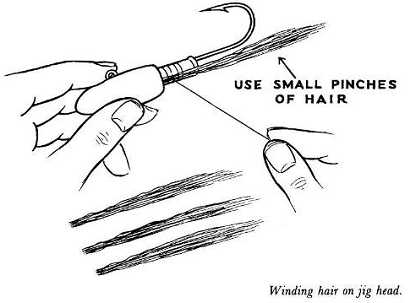
Keep doing this until you build up a thick body of hair around the hook, concealing most of it except the point and the barb. See illustration below. It is a good idea to make up several pinches of hair in advance
and lay them on the table to be used as needed.

When you have the full amount of bucktail hair wound on the jig head, finish the jig tying by wrapping the rest of the thread as tightly as possible over the jig. Then end it by tying a series of half-hitches.
Finally, cover the thread wrapping with a heavy coat of clear quick-drying cement.
|
| Freshwater Fishing | Bass Fishing | Saltwater Fishing | | Fishing Spoons | Fishing Spinners | Fishing Jigs | | Sinkers | Making Fishing Leaders | Hand Tools | | Link To Us | Contact Us | Preferred Partners | About This Site | | Site Map | |
Make-Your-Own-Fishing-Lures.com
© 2004 Make-Your-Own-Fishing-Lures.com. All Rights Reserved.


