Jig Molds
Make Personalised Molds
For Jigs And Reuse Them
Over And Over Again
The first step in making jig molds is to obtain a pattern which can be copied. For this you can buy a finished jig in a tackle store. Then remove the hair or feather dressing and file off the hook close to the jig head.
You can also fashion your own jig by using a soft wood to carve out a pattern. In fact, almost any wood can be used to carve out a pattern, but the softer woods are easier to work with.
Other substances suitable for making patterns are plastic, wax, soap and modeling clay. If you use wood for a pattern, sandpaper it smooth when finished and then varnish or shellac it to waterproof it.
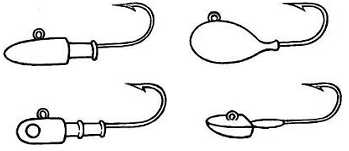
The illustration below shows some basic jig heads which can be followed when making a pattern.
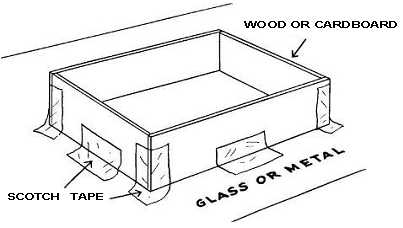
After you have the jig pattern you are ready to make the jig mold. For this you need a small container such as a cardboard box approximately 3 in. long, 2 in. wide and about 1 in. deep.
If you can't obtain such a small box you can make one, using heavy cardboard or thin sections of wood. Cut out the four sides to form a box and place them on a flat surface such as metal or glass.
Then anchor the box in place using scotch tape at the corners and sides. Modeling clay can also be used to hold the box sides to the metal or glass base. See illustration below.
The next step is to coat the inside of the box and the jig pattern itself with petroleum jelly to prevent the plaster from sticking. A thin coat is all that is necessary.
Now mix some of the plaster of Paris or water putty in a container with water. You can do this with a stick but your hands are much better for breaking up any lumps.
Keep adding water and plaster until you get a heavy consistency — one which still pours freely, however. And be sure you make enough to fill the box half full.
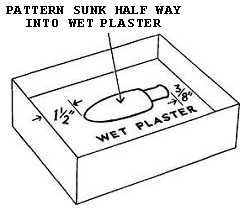
Now pour this plaster into the small box until it is half full. Then sink your jig pattern halfway into the wet plaster. You should allow a space of about 3/8 in. between the rear end of the jig and the box side and 1 1/2 in. from the opposite end of the box side to the jig. See illustration below.
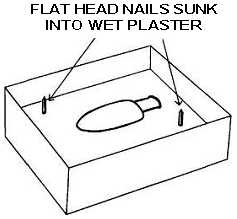
Next, sink two flat-headed nails into the wet plaster, allowing about 1/4 in. of the pointed ends to project. They can be placed diagonally opposite near the corners. They will act as locating pins when using the two jig mold halves when casting. See illustration below.
You now have half the jig mold completed and must wait until the plaster sets before you pour the other half. When it hardens (usually in about an hour), coat the entire surface and inside of the box with petroleum jelly or a heavy oil.
After this, mix more plaster of Paris or whatever substance you are using to make the jig mold. Then fill the box to the top with this mixture.
After this second pouring of plaster sets, in an hour or so, you break apart the box holding the cast. Then separate the two halves of the jig mold with a knife blade, as shown in the illustration below. This must be done with care in order not to break off any section of the plaster mold.
You'll notice a line indicating where the two halves meet and by slowly working a knife blade between them at several points you can usually separate them with no trouble.
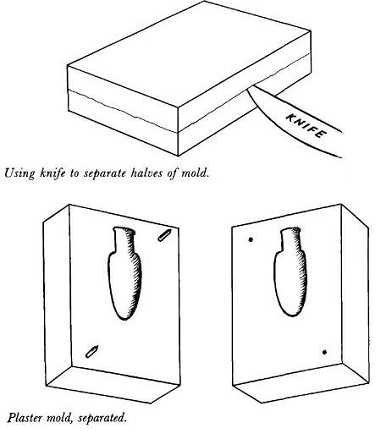
The original pattern will be found adhering to one of the halves, and this must be worked loose very carefully. You will then have two damp plaster halves as shown in the illustration above. Set them aside to dry and season for about two weeks.
This is important because if you try to pour hot metal into a damp mold it will spatter all over and will also crack the mold.
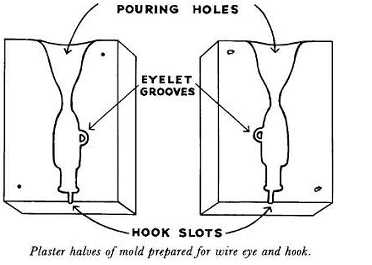
When the jig mold has seasoned thoroughly, cut out eyelet grooves and hook slots as well as a carving hole. First you must get samples of the hook size and wire eyelet you will use. The eyelets are easily formed from soft copper or brass wire in the shape shown in the illustration below.
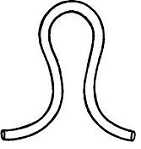
When you have the sample eyelet and hook, place them in position on the plaster mold and trace around them with a pencil to indicate the part which will have to be removed.
Wood carving tools are ideal for removing this plaster, to make room for the eyelet and hook, but you can also use a small, sharp knife. A larger knife can be used to carve out the funnel-shaped pouring hole. This is done to both halves of the plaster mold, as shown here.
For casting the jigs you will need some lead or block tin or a combination of the two such as bar solder. Scrap lead or tin can often be bought from a junk dealer or a plumber. Solder bars are sold by plumber's supply houses or hardware stores.
The greater the proportion of tin you use, the lighter the jig will be both in weight and appearance. A jig cast from almost pure tin will be very white and silvery in appearance and does not have to be painted.
A jig cast from lead will be dark and will turn black later. Such jigs are heavier and are usually painted. Melt the lead or tin in an iron ladle over a gas range or an electric stove.
Before putting the two plaster jig mold halves together, pour some of the hot metal into each half to warm it, or place the plaster mold close to the flame or heat to make it warm. The next step is to place the wire eyelet and the hook in the groove and slot. See illustration below.
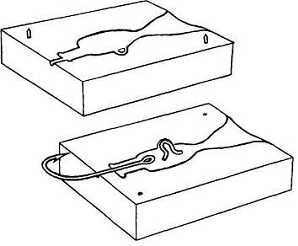
Then put the two halves together, hold them with the pouring hole up, and pour the molten metal as quickly as possible right up to the top of the pouring hole. See illustration below. When you notice the hot metal harden you can lay the jig mold on its side to cool off a bit.
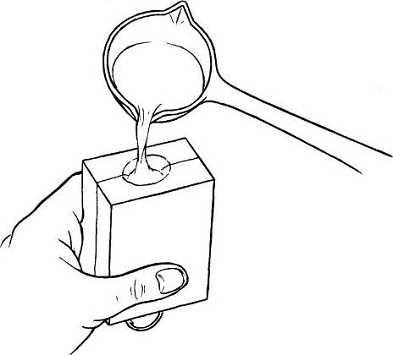
After the first jig is poured you'll usually need a glove or rag to hold the jig mold for subsequent pourings. It gets pretty hot and unless the plaster mold is very thick you won't be able to hold it in your bare hand.
If you want, you can grip the two plaster halves together with a C-clamp and hold the clamp, to keep your hand from getting burned.
After about a minute, depending on the size of the jig, you can separate the jig mold and take out the jig. It should be perfectly formed with no bad spots. If it isn't perfect, the lead or tin wasn't hot enough or the mold was too cool.
After a little experimenting you'll be able to tell just how hot the molten metal must be to pour right. For the best results, pour when the lead or tin has a bluish or purplish color on top.
Every so often it's a good idea to scrape the scum off the surface of the lead in the ladle. As you pour the jigs, keep cutting off the excess lead left at the pour hole with diagonal pliers and add it to the molten metal in the ladle.
Once you start pouring it's best to continue until you have poured enough jigs for your needs. If you have two or three jig molds you can alternate between them.
You can save time by designing your jig mold so that it takes the special jig hook shown in the illustration below. Then you don't have to use a separate wire eyelet and hook. The bend in the hook makes it possible to cast it in a jig so that it serves both purposes.
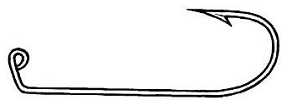
These special jig hooks are now available from most hook manufacturers and supply houses. They come in light wire patterns which are best for freshwater fishing, and also in heavier wire patterns such as the O'Shaughnessy which are used for salt water.
Naturally, the size of hook you use will also depend on the size of the jig and the fish you are after. The small hooks are used for the light jigs and freshwater fishing while the bigger hooks are for the heavier jigs and saltwater fishing.
A jig mold from plaster of Paris or water putty is generally good for casting about two or three dozen jigs before it breaks up. Small chips or holes in the plaster mold can be patched up with wet plaster or water putty.
When doing this, make sure you wet the section of the jig mold to be rilled before applying the liquid plaster. But if the mold breaks up too badly it's better to make a new one.
If you do a lot of fishing and need many jigs you can easily make a permanent jig mold which will last for years. All you do is go through the same steps in making the plaster halves.
When the plaster mold is dry you carve out the groove and slot for the hook as well as the pouring hole and then send both halves to a foundry and have them copied in bronze.
When you get the bronze halves back you must smooth the inside or the cavity with emery cloth. The bronze jig mold can be held together with a C-clamp for pouring.
Or, if you have the tools, you can tap holes in both sections of the bronze mold and add a hinge and handles. You can also buy ready-made metal jig molds complete with handles, in different sizes, weights, and shapes.
When one takes into consideration how many thousands of jigs they will turn out over the years they are well worth the cost. In fact, it is often cheaper to buy one of these ready-made jig molds than to bother making your own permanent metal mold.
Unless, of course, you have a special jig design you want to use. Then the best idea is to make up a few of those jigs, using a plaster mold.
If they turn out O.K. you can then have a permanent jig mold made at a foundry. But for ordinary fishing purposes you can usually make all the jigs you need with a plaster mold.
After the jigs are poured they require some finishing. A metal jig mold usually pours more perfect jigs than a plaster type, but even these still require some work.
Most of the excess metal can be clipped off with cutting pliers or with a knife, and a file can be used to remove the rest. Then give the jig a smooth finish by rubbing it with fine steel wool. If it is made from tin you can also buff it or polish it.
| Back to Top of Jig Molds |
Fishing Lures HOME :
Make-Your-Own-Fishing-Lures.com
© 2004 Make-Your-Own-Fishing-Lures.com. All Rights Reserved.


